In This Article
When tackling woodworking or DIY projects, a common question arises: "What grit sandpaper should I use for different tasks?" To effectively answer this, let’s explain grit sandpaper and its various applications. Understanding grit sizes is essential for achieving a comfortable solution for your surface finishing needs, whether you’re smoothing rough edges or preparing wood for painting. This article will provide a comprehensive overview, detailing the different grit sizes and their specific uses, ensuring you select the right sandpaper for any job. Dive in to discover how to enhance your projects with the perfect grit!
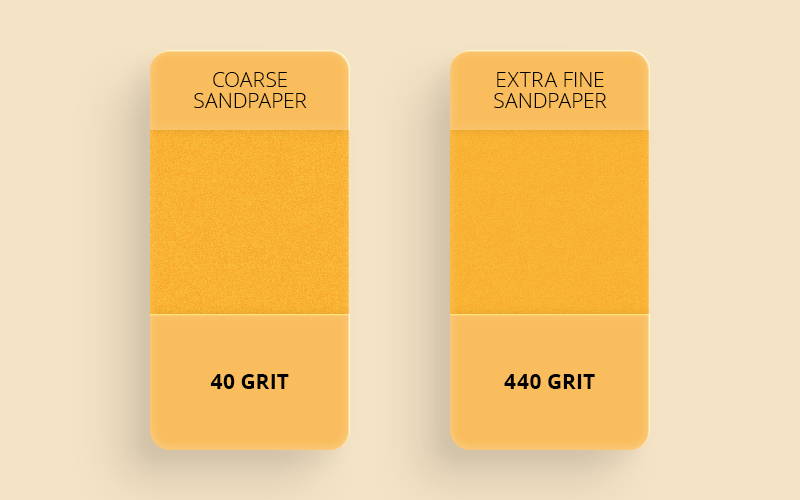
Grit sandpaper is categorized by the size of its abrasive particles, with lower numbers indicating coarser grits and higher numbers indicating finer grits.
Common grit sizes range from 40 (very coarse) to 600 (very fine), each serving specific purposes in sanding and finishing tasks.
Coarse grits are ideal for heavy material removal, while fine grits are used for smoothing surfaces and preparing for finishes.
Selecting the right grit is crucial for achieving the desired surface finish and ensuring the longevity of the material being worked on.
When it comes to achieving a smooth, polished finish on wood, metal, or other surfaces, understanding grit sandpaper is essential. Whether you're a DIY enthusiast or a professional woodworker, knowing how to select the right sandpaper can significantly impact the outcome of your project. In this guide, we will delve deep into all aspects of grit sandpaper, providing you with the knowledge to make informed choices for your sanding tasks.
Grit sandpaper refers to the measure of the coarseness or fineness of the abrasive particles adhered to the paper backing. The grit number indicates the size of these particles: lower numbers (like 40 or 60) represent coarser sandpapers suitable for heavy material removal, while higher numbers (like 400 or 1000) indicate finer sandpapers used for polishing and smoothing surfaces. Thus, understanding grit sandpaper is crucial for selecting the right type for any woodworking, metalworking, or finishing project.
Grit refers to the size of the abrasive particles on the sandpaper. Each sheet is graded according to the number of particles per square inch. The American National Standards Institute (ANSI) standardizes these measurements, providing a clear understanding of what each grit level is suited for.
Source: empireabrasives.com
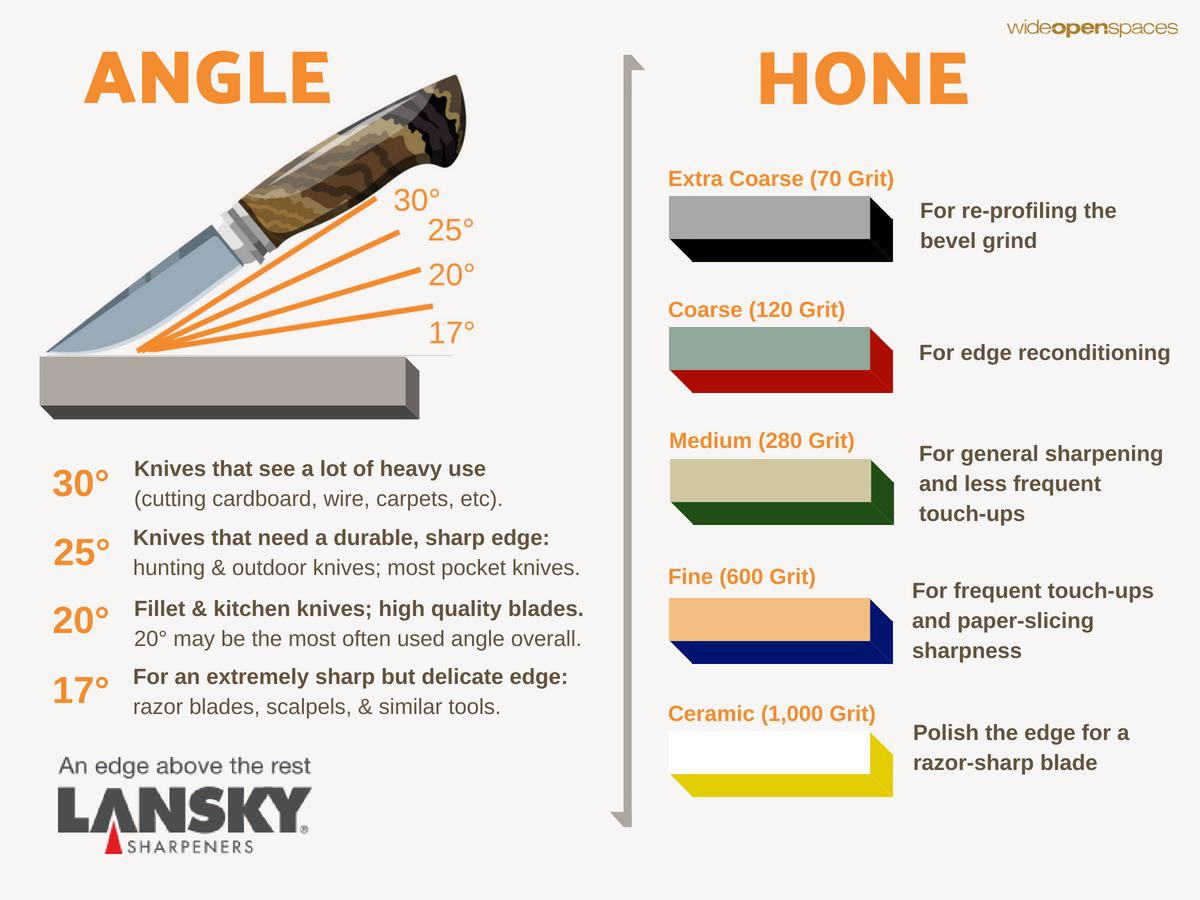
Coarse Grit (40-60): Used for heavy material removal and shaping.
Medium Grit (80-120): Ideal for smoothing surfaces after initial sanding.
Fine Grit (150-220): Used for preparing surfaces for finishing and paint.
Very Fine Grit (240-600): Used for final sanding before finishing.
Understanding the grit size allows woodworkers and DIYers to select the appropriate sandpaper for specific tasks, ensuring the best results.
Choosing the right grit sandpaper is crucial for achieving desired results. Here are some guidelines:
Assess the Material: Different materials require different grits. For instance, wood typically starts with a coarser grit and moves to finer grits, while metal may require a different approach.
Determine the Condition of the Surface: If you are sanding a rough surface, start with a lower grit. If the surface is already smooth and just needs a little touch-up, opt for a higher grit.
Consider the Finish: If you're preparing wood for staining or varnishing, finer grits are recommended to avoid scratches visible in the final finish.
Progression of Grits: A common practice is to start with a coarse grit and gradually move to a finer grit. For example, begin with 80 grit, progress to 120 grit, and finish with 220 grit.
Sandpaper is available in several grits, each suited for specific tasks:
P80 to P120 (Coarse to Medium): Used for initial sanding and material removal.
P150 to P220 (Medium to Fine): Suitable for smoothing surfaces before finishing.
P240 to P320 (Fine): Ideal for sanding between coats of finish or for final touches.
P400 to P600 (Very Fine): Used for polishing and achieving a glass-like finish.
P1000 and above (Ultra Fine): Used in specialized applications such as automotive paint jobs or fine woodworking.
Different materials may require different types of sandpaper. For example, aluminum oxide is often chosen for its durability and versatility, while silicone carbide is preferred for harder materials like glass.
The grit size significantly influences the sanding process and the resulting finish. Here are some key factors to consider:
Material Removal Rate: Coarser grits remove material faster, making them suitable for shaping and heavy sanding. Finer grits remove less material but produce a smoother finish.
Potential for Damage: Using sandpaper that is too coarse for a specific task can lead to scratches, gouges, or uneven surfaces. It's essential to match the grit to the material and desired outcome.
Finish Quality: The final appearance of the surface is largely dependent on the grit progression. Skipping grits can result in visible scratches or inconsistencies in the finish.
Sandpaper is manufactured using various materials, each with its characteristics:
Aluminum Oxide: The most common abrasive used in sandpaper, known for its durability and versatility. It works well on wood, metal, and plastic.
Silicon Carbide: This material is harder and sharper than aluminum oxide, making it ideal for sanding harder materials like glass, ceramics, and plastics.
Garnet: A natural abrasive that produces a finer finish on wood. It’s less durable than synthetic abrasives but is preferred for finishing.
Ceramic: Known for its longevity, ceramic sandpaper is used for heavy-duty sanding tasks, especially in woodworking.

Source: familyhandyman.com
The backing material of sandpaper also affects its performance. Common types include:
Paper: Standard sandpaper uses paper backing and is suitable for most hand sanding tasks.
Cloth: Cloth-backed sandpaper is more durable and is often used for sanding curved surfaces or heavy-duty applications.
Film: Some sandpapers use a thin plastic film backing, which provides a smoother finish and is often used for automotive applications.
Understanding the grading system is crucial for selecting the right sandpaper. The grades include:
P-grade: Indicates the paper grade used in manufacturing.
Grit Size: The number assigned to sandpaper indicates the size of the abrasive particles.
Type of Sandpaper: Includes various types, such as wet/dry sandpaper used for automotive work, and sanding sponges used for irregular surfaces.
Versatility: Sandpaper comes in various grits and types, making it suitable for a wide range of materials and applications.
Cost-Effective: Compared to other materials and methods for smoothing surfaces, sandpaper is relatively inexpensive.
Ease of Use: Sandpaper can be used by anyone, from professionals to DIY enthusiasts, making it widely accessible.
Finish Quality: With the correct grit progression, sandpaper can achieve an exceptionally smooth finish.
Potential for Damage: If misused, sandpaper can damage surfaces, particularly if a grit that is too coarse is used.
Dust Generation: Sanding creates fine dust, which can be a health hazard and requires proper ventilation and safety gear.
Wear and Tear: Sandpaper can wear out quickly, especially when used on harder materials, leading to the need for frequent replacements.
Skill Requirement: Achieving the desired finish may require practice and skill, especially when determining the right grit progression.
Woodworking: Sandpaper is essential in furniture making, cabinetry, and other wood-related projects for achieving smooth finishes.
Metalworking: Used in automotive repair and fabrication, sandpaper helps prepare metal surfaces for painting and finishing.
Crafting: Hobbyists use sandpaper in various crafting projects, from model building to jewelry making.
Home Improvement: DIY projects, such as refinishing furniture or preparing walls for painting, often involve sandpaper.
Refinishing a Wood Table: Start with 80 grit to remove old finish, move to 120 grit for smoothing, and finish with 220 grit for a polished surface.
Smoothing Metal Edges: For metalwork, begin with a coarse grit to shape and smooth sharp edges, then progress to finer grits for a polished look.
Preparing Walls for Paint: Use medium grit sandpaper to remove any imperfections before applying primer or paint for a flawless finish.
Understanding grit sandpaper is essential for anyone involved in woodworking, metalworking, or any surface finishing projects. The right choice of grit can mean the difference between a rough, unrefined finish and a smooth, professional-looking result. By considering the material, condition of the surface, and the desired outcome, you can select the perfect sandpaper for your needs. With this comprehensive guide, you now have the knowledge to choose wisely and enhance the quality of your projects.
For wood, it’s best to start with 80 grit for initial sanding, proceed to 120 grit for smoothing, and finish with 220 grit for a polished surface before applying any finish.
Skipping grits can lead to visible scratches and an uneven surface. It’s recommended to progress through each grit for the best results.
Change sandpaper when it becomes clogged, frayed, or loses its cutting power. Regularly changing sandpaper ensures efficient sanding and better finishes.
Yes, wet sanding involves using water or other lubricants to reduce dust and keep the abrasive particles cool, resulting in a finer finish, especially on paint and clear coats.
Sandpapers can go up to 2000 grit or higher, often used in specialized applications like automotive refinishing or polishing glass surfaces.
By understanding grit sandpaper and its applications, you'll be better equipped to tackle your projects with confidence, ensuring high-quality finishes every time.
When it comes to selecting the right sandpaper grit, users often encounter various challenges. Below are three common pain points, complete with relatable scenarios and practical solutions to help them navigate their sanding projects effectively.
User Scenario:
Emily is a DIY enthusiast who loves refinishing furniture. She recently bought a vintage chair and was excited to start sanding it down. However, when she went to the store, she was overwhelmed by the different grit numbers on the sandpaper. She stood there, unsure of which grit to choose, and left the store feeling frustrated and confused.
Solution:
Understanding the grit number is crucial. Grit numbers indicate the size of the abrasive particles on the sandpaper. A lower grit number (e.g., 60-80) is coarser and removes material quickly, making it ideal for heavy sanding tasks like stripping paint. Conversely, higher grit numbers (e.g., 220-400) are finer, perfect for finishing and smoothing surfaces.
Tip:
For a project like Emily's, start with a lower grit (like 80) to remove old finishes, then progress to a higher grit (like 220) for a smooth finish. A simple guide to remember is: lower numbers for heavy sanding, higher numbers for finishing!
User Scenario:
John is a carpenter who frequently works with various materials, including wood, metal, and plastic. He often finds himself unsure which sandpaper grit is appropriate for each type of material, leading to inconsistent results and wasted materials.
Solution:
The key to effective sanding is matching the grit to the material you’re working with. Here’s a quick reference:
Wood: Start with 80-120 grit for rough sanding and move to 180-220 grit for finishing.
Metal: Use 120-180 grit for sanding down surfaces, and finish with 240-320 grit for a clean look.
Plastic: Opt for 180-240 grit, as finer papers can prevent scratching.
Tip:
Keep a variety of grits on hand for different projects. A good practice is to have a starter pack of sandpaper that includes a range of grits, so you’re always prepared for any material you encounter!
User Scenario:
Sara is a beginner DIYer who has taken on the task of restoring an old wooden desk. While shopping for supplies, she was overwhelmed by the different types of sandpaper—wet/dry, aluminum oxide, garnet, and more. She felt lost and ended up purchasing the wrong type, which delayed her project.
Solution:
Understanding the types of sandpaper can simplify the selection process:
Aluminum Oxide: Durable and versatile; great for wood and metal projects.
Garnet: Ideal for woodworking; provides a smooth finish but wears out quickly.
Wet/Dry: Can be used with water or oil, perfect for finishing and polishing.
Tip:
For Sara’s desk restoration, aluminum oxide sandpaper would be a reliable choice for both heavy sanding and finishing. Educating yourself on these types can make a significant difference in your project’s outcome.
By addressing these common pain points, users can feel more confident and empowered in their sanding projects, leading to better results and more enjoyable DIY experiences.

Source: toolstop.co.uk
When considering the process of using sandpaper, particularly the concept of "grit," it's essential to explore different methods of surface preparation and finishing. Each method has its own unique features, advantages, and drawbacks. Below, we compare the traditional use of grit sandpaper with alternative techniques such as sanding blocks and electric sanders. This comparison will help you make an informed decision based on your specific project needs.
| Feature | Explain Grit Sandpaper | Sanding Block | Electric Sander |
|---|---|---|---|
| Usage | Manual sanding for various surfaces | Manual sanding for precision work | Power-assisted sanding |
| Efficiency | Time-consuming, but offers control | Moderate efficiency, good for details | High efficiency, quick results |
| Surface Finish | Can achieve a smooth finish | Good for flat surfaces | Excellent for large areas |
| Skill Required | Basic skills needed for effective use | Requires more technique | Minimal skill needed, user-friendly |
| Cost | Low-cost option | Low-cost option | Higher initial investment |
This table outlines the key aspects of each method, allowing you to evaluate which sanding technique best suits your project requirements.
— Industry Expert Analysis
Tags: Black Silicon Carbide, White Fused Alumina, Brown Fused Alumina, Pink Fused Alumina, Black Fused Alumina